Editor Module Design
This article focuses on designing the editor module from scratch: what is the design approach? What is the essence of orchestration? Around that essence, how do we design and implement the corresponding functional modules?

What is orchestration
Orchestration means taking all materials in the designer, applying layout settings, component settings, and interaction settings (JS authoring/logic orchestration), and producing a schema description that meets business requirements.
The essence of orchestration
First, what is the essence of orchestration?
The essence of orchestration is producing data that conforms to the Alibaba Mid/Back-Office Frontend Building Protocol Specification. In this scenario, the protocol is carried by JSON. For example:
{
  "componentName": "Page",
  "props": {
    "layout": "wide"
  },
  "children": [
    {
      "componentName": "Button",
      "props": {
        "size": "large"
      }
    }
  ]
}
In real scenarios, there may be hundreds or thousands of nodes. Each node supports add, delete, modify, move, insert child, and other operations, along with many constraints. JSON is awkward to manipulate, so we modeled node and property models after the DOM for a more programmable orchestration experience. This is the foundation of the orchestration system.
Second, after each orchestration action (CRUD), the view must be rendered in real time. Views broadly include presentation on browsers, Rax, mini programs, Flutter, and more. Which renderer renders the JSON structure should be extensible by users; we define a mechanism to connect design mode and render mode.
At this point we have the most basic orchestration module functionality. Next comes refining details and expanding features, such as:
- Overall functional area layout of the orchestration panel;
- Node property design; node delete/move operations; container node design;
- Node drag, drag positioning design and implementation;
- Canvas aids for nodes, such as hover, selection, selection actions, resize, drag placeholders, etc.;
- Coordinate conversion between design mode and render mode, scroll listening, etc.;
- Hotkey mechanism;
- History: undo and redo;
- Structured plugin extension mechanism;
- In-place editing;
There are many modules, but remember: all of them exist to help users orchestrate better on the canvas and to extend capabilities.
Orchestration functional modules
Model design
Orchestration operates on schema, but at runtime we split schema into many layers, each with clear responsibilities. That is model design in the low-code engine.
By combining schema with common operations, the low-code engine models are divided into node model, property model, document model, and project model.
Project model (Project)
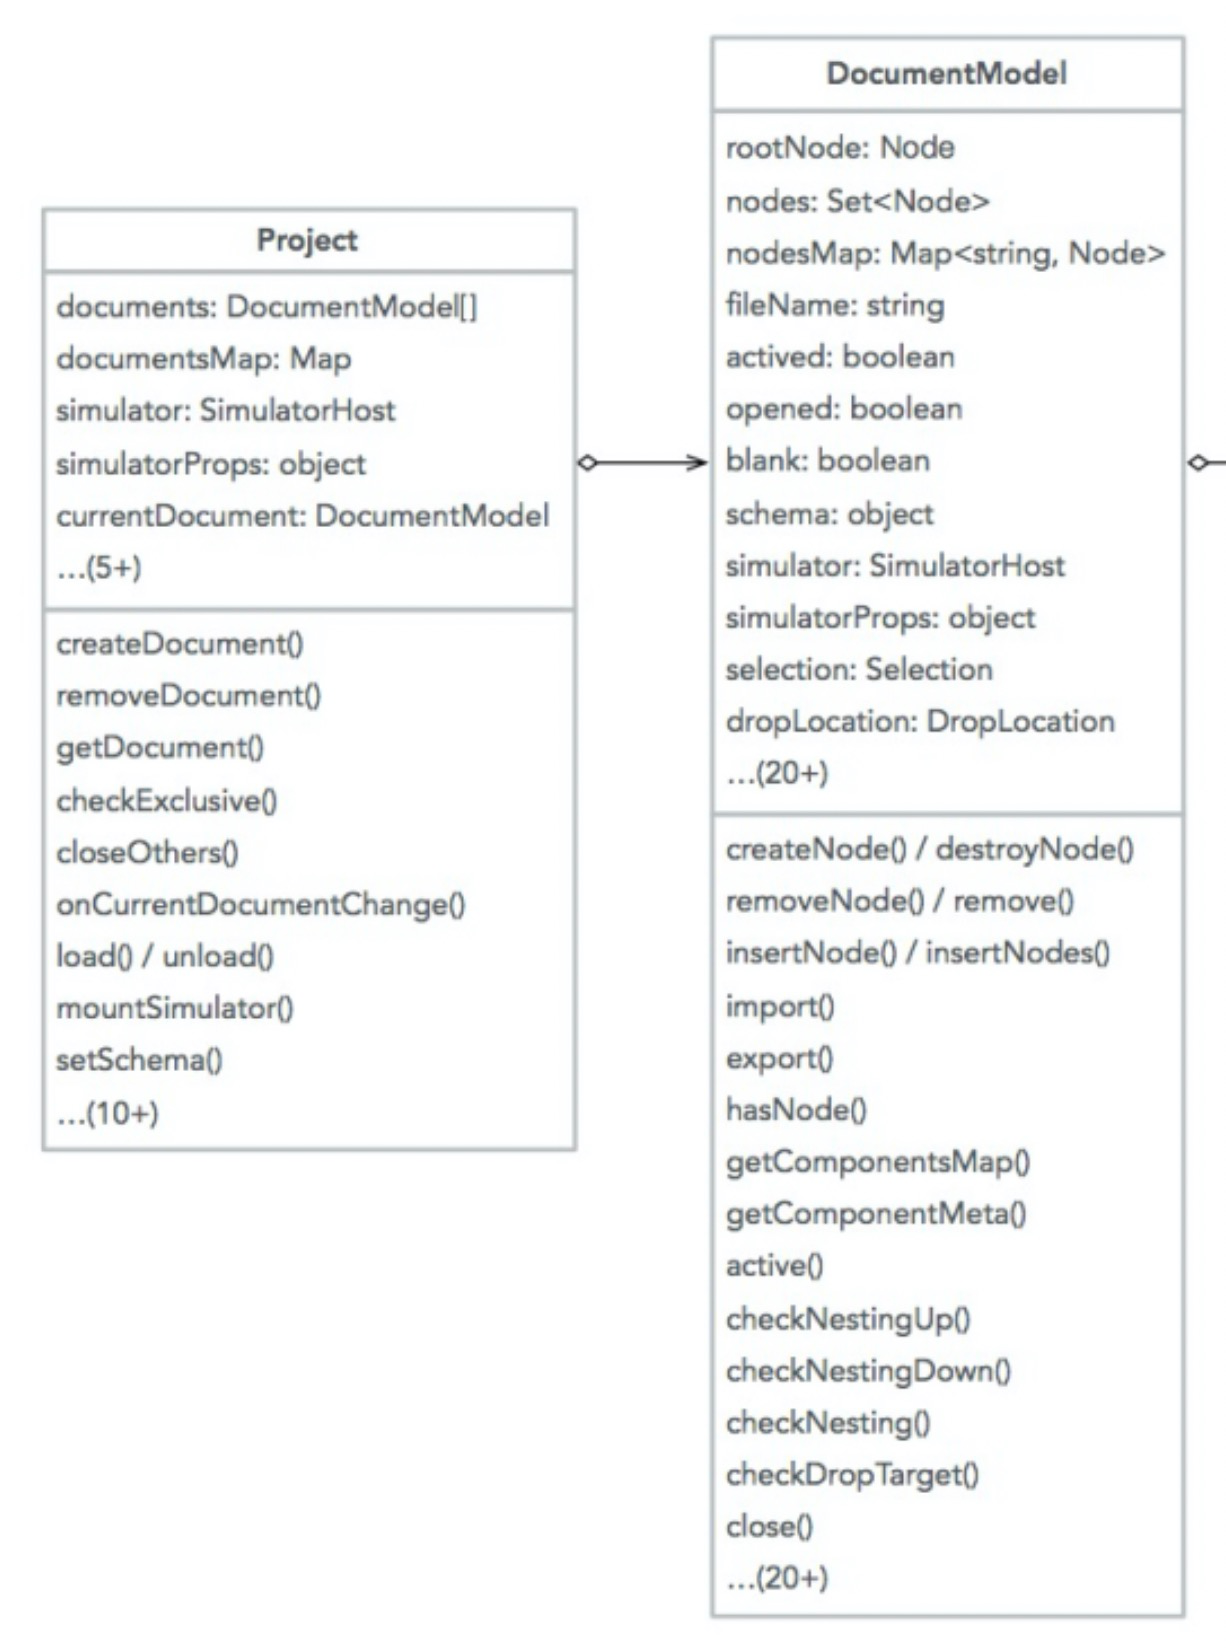
The project model provides project management. When the engine starts, it typically creates one and only one Project instance. A project model instance can hold multiple document model instances. The document model currently being designed is marked active and called currentDocument, available via project.currentDocument.
A Project contains several DocumentModel instances—the relationship is 1-to-n, as shown below:
Document model (DocumentModel)
The document model provides document management. Each page is a document flow corresponding to one document model. A document model contains a tree of Nodes, similar to the DOM. We manipulate the Node tree through the document model to manage documents. Each document model has many Nodes but only one root Node: rootNode and nodes.
The document model can export document schema via the Node tree with doc.schema and use it for rendering.
Their relationship is shown below:

Node model (Node)
Here is an example of a Node in schema:
{
  componentName: 'Text',
  id: 'node_k1ow3cbf',
  props: {
    showTitle: false,
    behavior: 'NORMAL',
    content: {
      use: 'zh_CN',
      en_US: 'Title',
      zh_CN: 'Personal info',
      type: 'i18n',
    },
    fieldId: 'text_k1ow3h1j',
    maxLine: 0,
  },
  condition: true,
}
The example above is a Text Node. The node model manages Schema at this level. It focuses on single-level schema operations. Some node model methods illustrate its capabilities:
declare class Node<Schema extends NodeSchema = NodeSchema> {
  // Props
  props: Props;
  get propsData(): PropsMap | PropsList | null;
  getProp(path: string, stash?: boolean): Prop | null;
  getPropValue(path: string): any;
  setPropValue(path: string, value: any): void;
  clearPropValue(path: string): void;
  mergeProps(props: PropsMap): void;
  setProps(props?: PropsMap | PropsList | Props | null): void;

  // Node
  get parent(): ParentalNode | null;
  get children(): NodeChildren | null;
  get nextSibling(): Node | null;
  get prevSibling(): Node | null;
  remove(useMutator?: boolean, purge?: boolean): void;
  select(): void;
  hover(flag?: boolean): void;
  replaceChild(node: Node, data: any): Node;
  mergeChildren(
    remover: () => any,
    adder: (children: Node[]) => NodeData[] | null,
    sorter: () => any,
  ): void;
  removeChild(node: Node): void;
  insert(node: Node, ref?: Node, useMutator?: boolean): void;
  insertBefore(node: any, ref?: Node, useMutator?: boolean): void;
  insertAfter(node: any, ref?: Node, useMutator?: boolean): void;

  // Schema
  get schema(): Schema;
  set schema(data: Schema);
  export(stage?: TransformStage): Schema;
  replaceWith(schema: Schema, migrate?: boolean): any;
}
Not all methods are shown, but the node model has three core areas:
Propsmanagement: manages allProps through thePropsinstance, including add, set, delete, and other prop operations.Nodemanagement: manages relationships in theNodetree and modifies the currentNodeor child nodes.Schemamanagement: get and modify schema description at the current level throughNode.
At the Node level, granularity of Props, Node tree, and Schema management is minimized for stronger extensibility.
Property model (Prop)
One Props corresponds to many Props; each Prop corresponds to one field under props in schema.
Props manages content under the props field of the node model. Each Prop manages one key under props. In the example below, one Props manages at least six Props; one Prop manages the value of showTitle.
{
  props: {
    showTitle: false,
    behavior: 'NORMAL',
    content: {
      use: 'zh_CN',
      en_US: 'Title',
      zh_CN: 'Personal info',
      type: 'i18n',
    },
    fieldId: 'text_k1ow3h1j',
    maxLine: 0,
  },
}
Component description model (ComponentMeta)
Orchestration is equivalent to operating nodes and properties directly. A node and its properties correspond to a real component, and real components have constraints: component name, component type, supported properties and property types, whether the component can be dragged, supported extension actions, whether it is a container component, whether component B can be placed inside component A, and so on.
We designed a protocol dedicated to component description: the Mid/Back-Office Building Component Description Protocol. The editor module also has modules that parse and use descriptions conforming to that protocol.
Each component corresponds to one ComponentMeta instance whose properties and methods are all fields in the description protocol. All ComponentMeta instances are created and managed by the designer's designer module. Other modules obtain specified ComponentMeta instances through designer; each Node instance mounts the corresponding ComponentMeta.
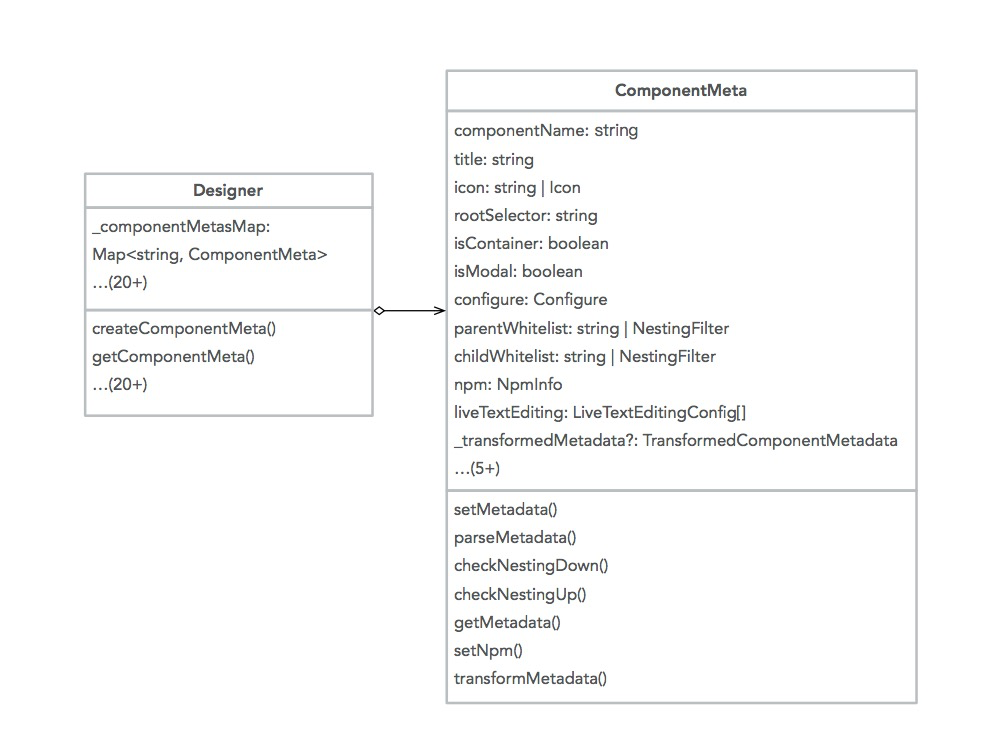
The component description model is the foundation for orchestration aids, including the settings panel and drag positioning.
Relationships among project, document, node, and property models
Overall, one Project contains several DocumentModel instances. Each DocumentModel contains a tree of Nodes (similar to the DOM). Each Node manages all Props through a Props instance. The relationship diagram is below.
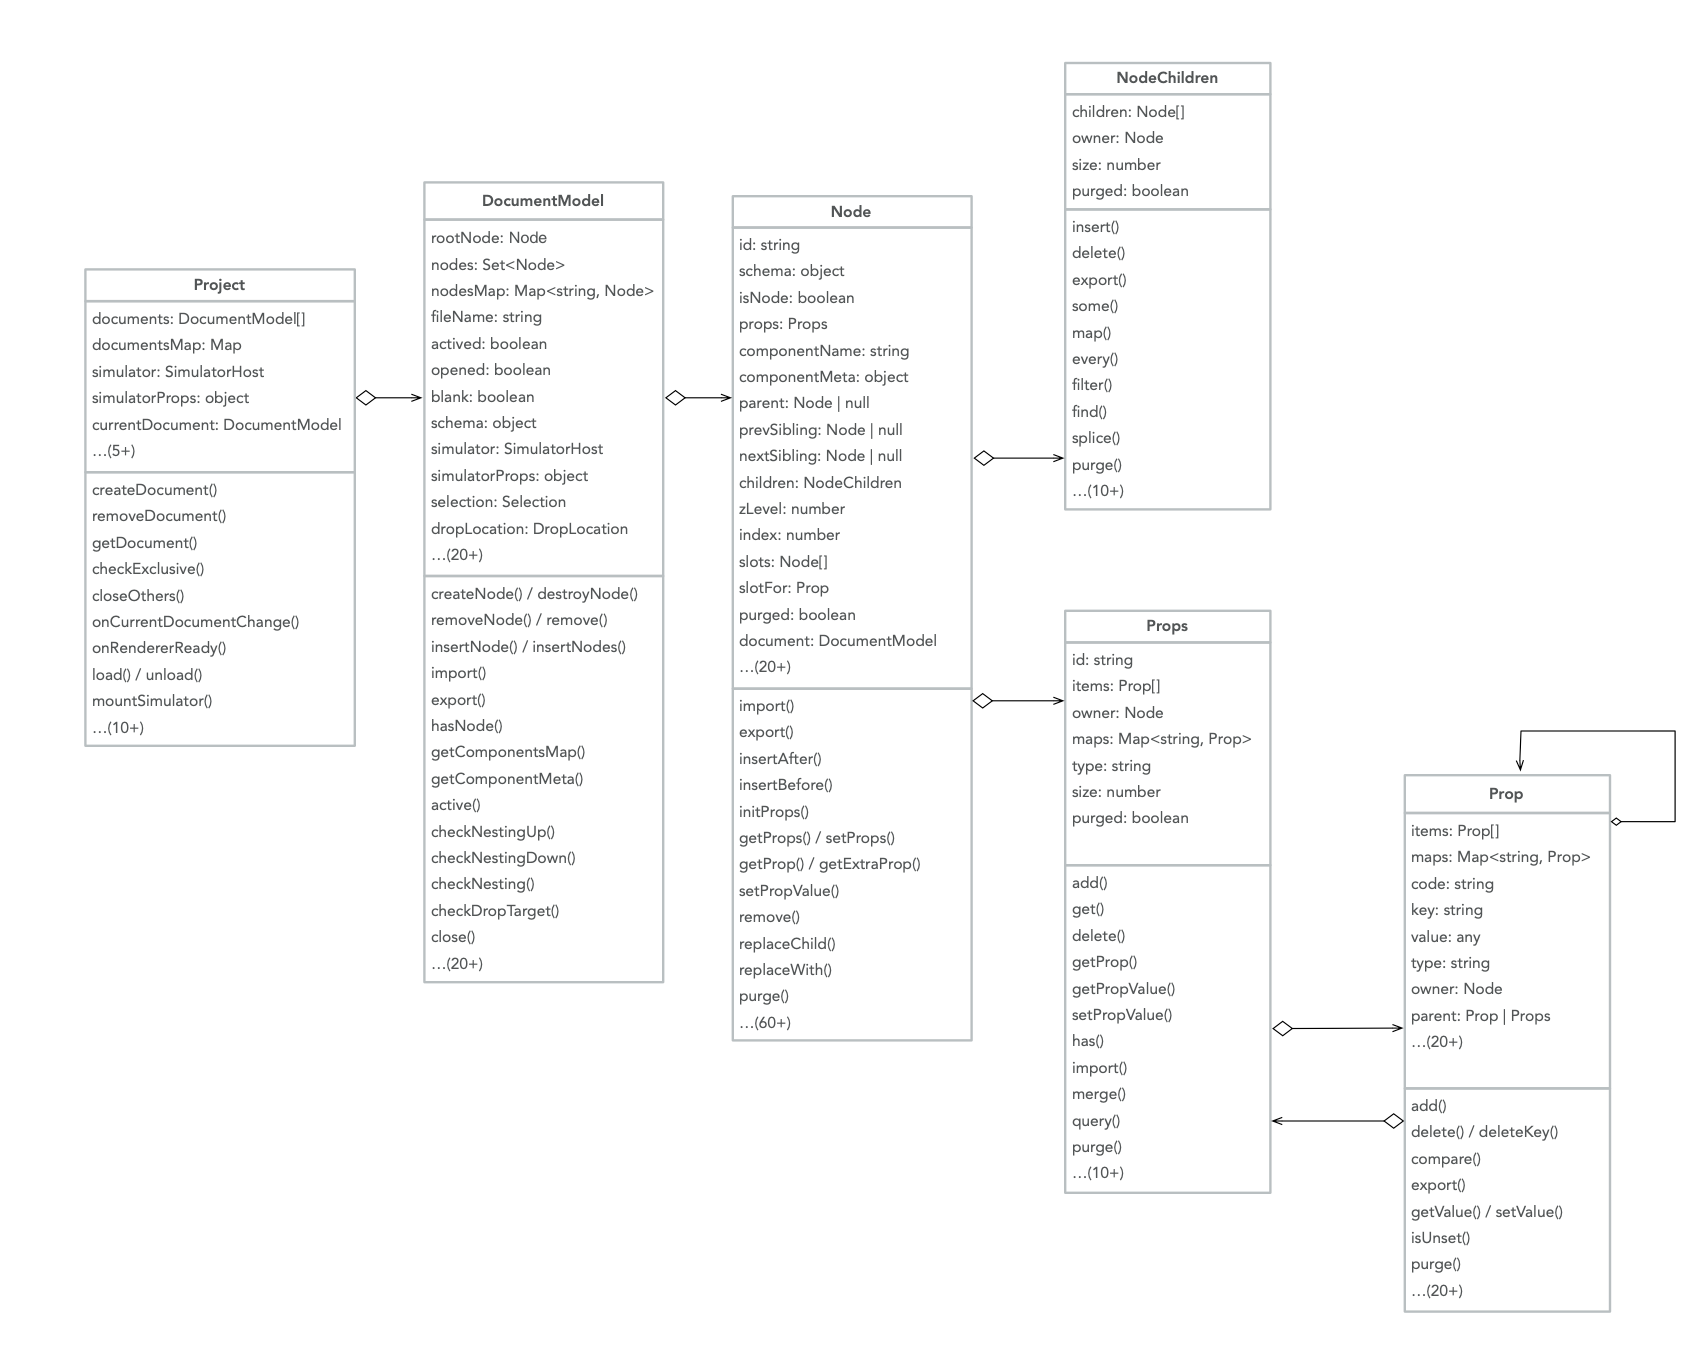
Node and property models are the engine foundation and run through almost all modules. The class diagram above shows responsibilities and dependencies of the core classes.
Node and property models are equivalent to JSON data structures, and the essence of orchestration is producing JSON data structures. We can restate it: the essence of orchestration is operating node and property models.
// Example orchestration code
rootNode.insertAfter({ componentName: 'Button', props: { size: 'medium' } });
rootNode.insertAfter({ componentName: 'Button', props: { size: 'medium' } });
rootNode.children.get(1).getProp('size').setValue('large');
rootNode.children.get(2).remove();
rootNode.export();
// => produces schema
Canvas rendering
Canvas rendering uses a dual-layer architecture of design mode and render mode.
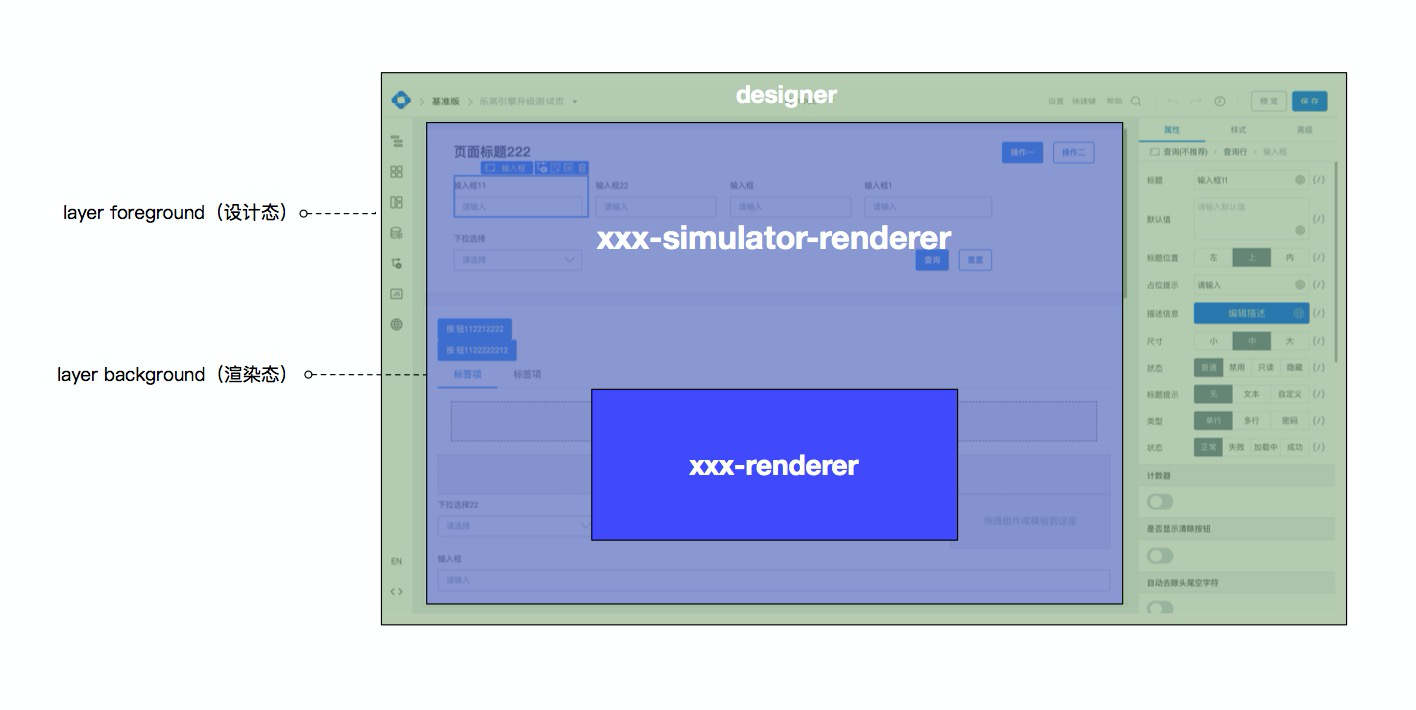
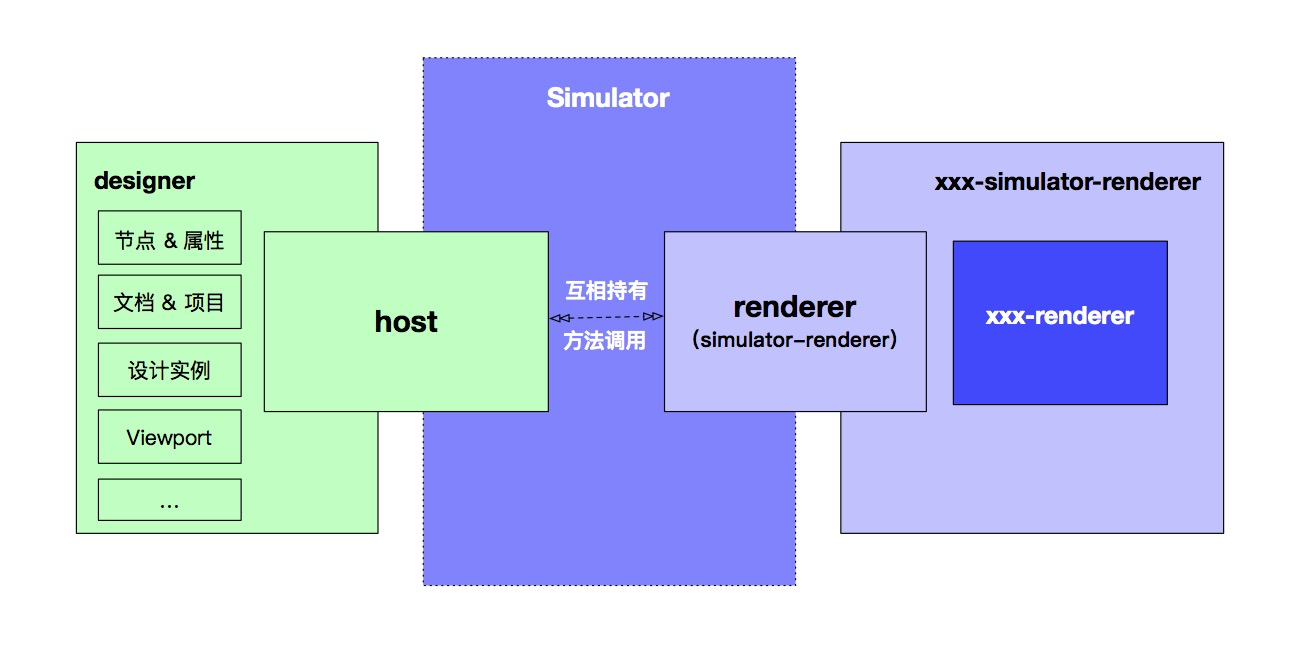
As shown, the designer and renderer live in different frames. The renderer is embedded as a separate iframe. Benefits: (1) a cleaner runtime environment closer to production; (2) extensibility—users can customize their renderer based on interface constraints.
xxx-renderer
xxx-renderer is a pure renderer. Given schema, dependent components, and configuration, it completes rendering.
xxx-simulator-renderer
xxx-simulator-renderer communicates with the host to interact with the designer. It provides DocumentModel to obtain schema and components and passes them to xxx-renderer for rendering.
It also exposes interfaces to help the designer with interaction—for example, when clicking anywhere on the canvas, compute the clicked component instance, find the corresponding Node in the designer, and get component position/size so the designer can draw auxiliary UI such as node selection.
react-simulator-renderer
Using the official react-simulator-renderer as an example, here is how the editor module handles clicking a DOM node.
During initialization, the renderer adds a ref to each element when rendering and stores instances on creation. We add a Symbol('_LCNodeId') property to instances.
After a click, it finds the corresponding fiberNode via __reactInternalInstance$, recursively finds the React component instance, and locates one with Symbol('_LCNodeId')—the property added during initialization.
Through Symbol('_LCNodeId'), we get the Node id and find the Node instance.
Through getBoundingClientRect, we get DOM information for the rendered Node, including x, y, width, height, etc.
With DOM information, we render focus indicators in the right place. Hover, drag placeholders, resize handlers, and other auxiliary UI follow similar logic.
Communication mechanism
Because designer and renderer are in two frames, event communication and method calls go through proxy objects on each side. Other coupling is not allowed.
host
host can access all designer modules. Because the renderer layer does not handle designer-related interaction, host is added as a communication middle layer. host can access all designer modules and exposes methods for simulator-renderer to call, such as schema and component retrieval.
simulator-renderer calls host methods to pass schema, components, and other parameters to the renderer for rendering.
xxx-simulator-renderer
For bidirectional interaction, simulator-renderer must also expose methods for host to call when the designer or user interacts—for example, node selection mentioned above. Required methods include:
- getClientRects
- getClosestNodeInstance
- findDOMNodes
- getComponent
- setNativeSelection
- setDraggingState
- setCopyState
- clearState
host and simulator-renderer then achieve bidirectional communication through these methods, enabling designer-to-canvas and canvas-to-designer flows while keeping the designer isolated.
Core orchestration aids
Settings panel and setters
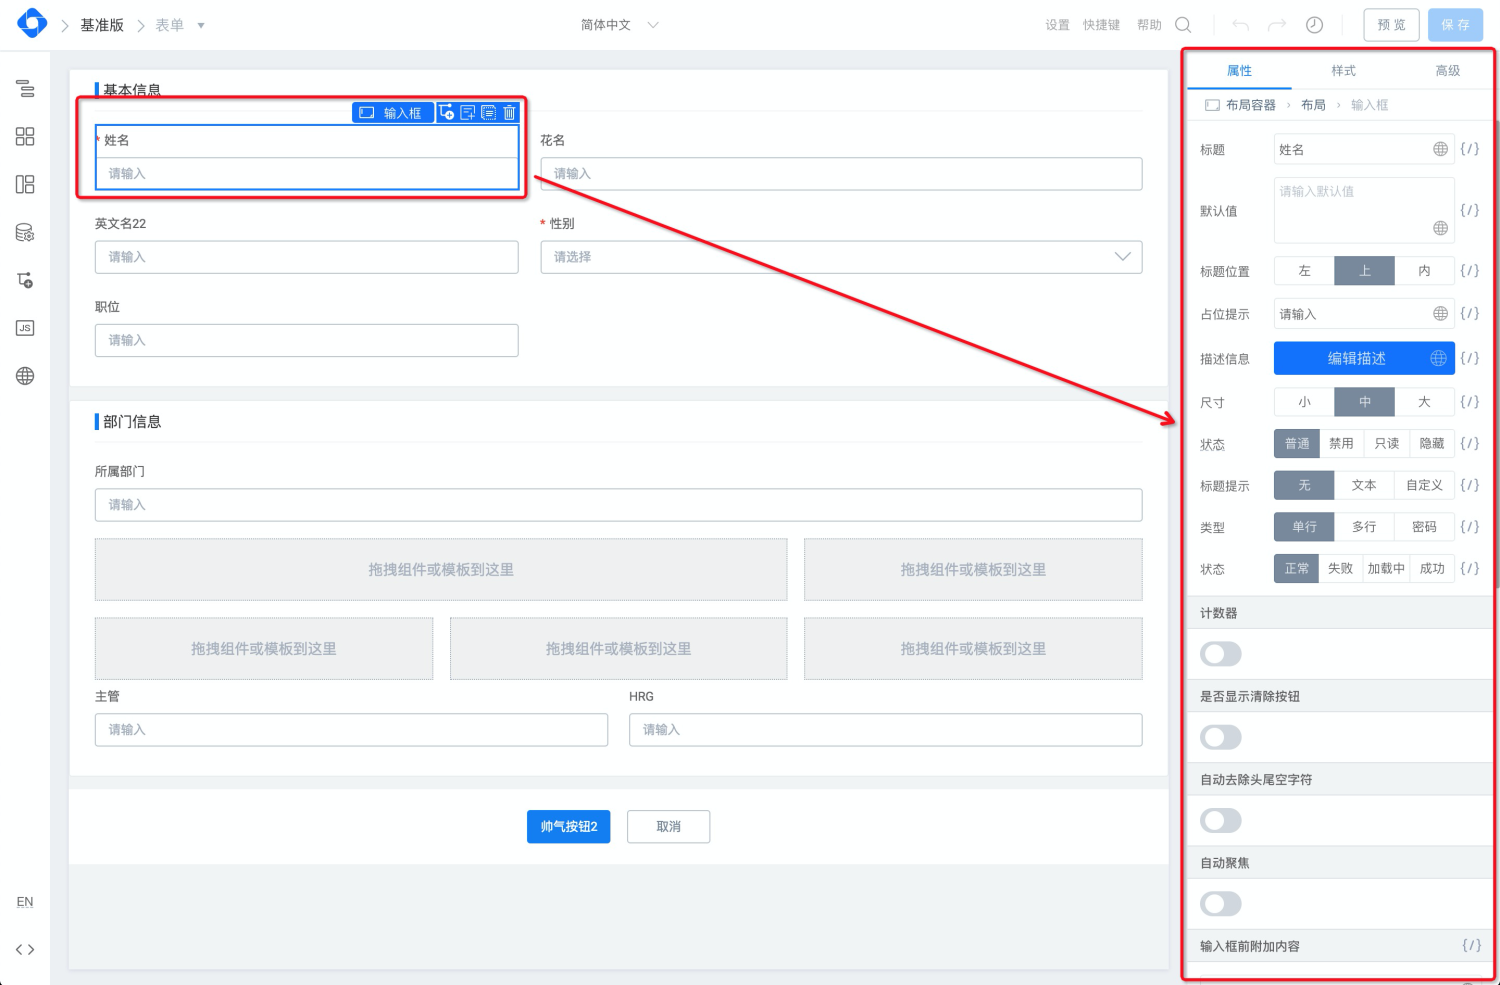
When clicking a DOM node on the render canvas, xxx-simulator-renderer obtains the Node. Each Node mounts a ComponentMeta instance. Through ComponentMeta, we get the current component's description model and all property configurations supported by the component—that is, the current Node.
Settings panel
The settings panel presentation structure is determined by ComponentMeta.configure.
{
  "component": {
    "isContainer": true
  },
  "props": {
    "isExtends": true,
    "override": [
      {
        "name": "count",
        "title": {
          "label": "Displayed number",
          "tip": "count|shown as ${overflowCount}+ when greater than overflowCount; hidden by default when 0",
          "docUrl": "https://fusion.alibaba-inc.com/pc/component/basic/badge"
        },
        "setter": {
          "componentName": "MixedSetter",
          "props": {
            "setters": ["StringSetter", "ExpressionSetter"]
          }
        }
      }
    ]
  }
}
component.isContainer describes whether the component is a container. Properties under props are what the settings panel shows, including property name, setter used, and which property is affected after configuration.
This is description only. The editor module's SettingTopEntry implements settings panel management.
SettingTopEntry contains n SettingFields. Each SettingField corresponds to a setter described next. SettingTopEntry manages multiple SettingFields.
Setters
Each configurable property for a selected node has a corresponding setter configuration, such as text, number, color, JSON, choice, i18n, expression, or mixed types.
A setter is essentially a React component, but when the settings panel renders it, it passes the SettingField instance for the current configuration item. SettingField wraps a Prop instance. Setter behavior and UI are controlled by the setter itself, but when property values change, they must be updated through the Prop under SettingField, because changing the Prop instance changes schema. That way saved schema is correct after configuration, and only schema changes trigger canvas re-render.
Drag engine and drag positioning
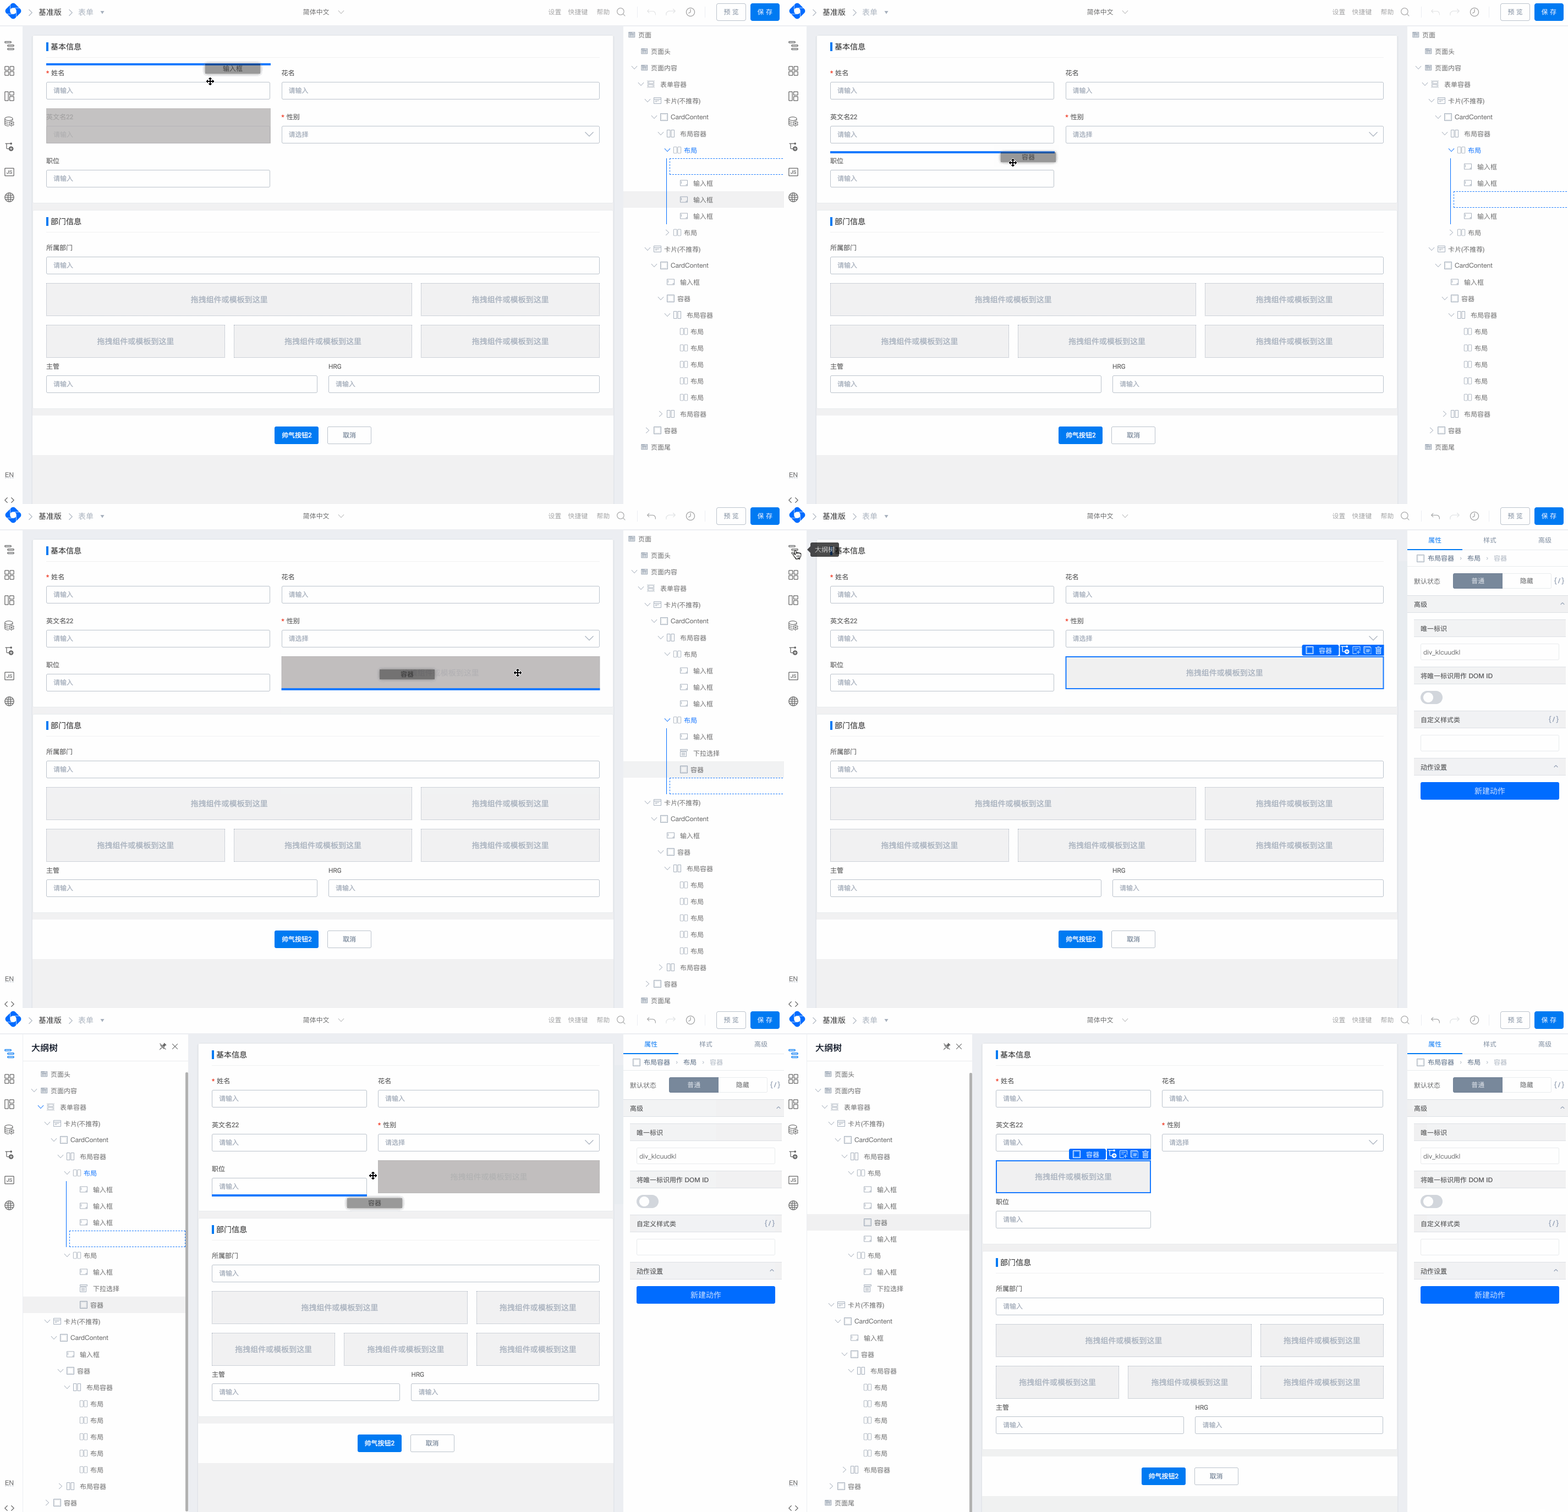
The drag engine (Dragon) mainly drags the dragged object to a target location. Key concepts:
- Dragged object -
DragObject - Drop target -
DropLocation - Drag sensor -
IPublicModelSensor - Locate event -
LocateEvent
Sensor
During engine initialization, we listen to mouse, keyboard, and drag events on document and the iframe's contentDocument to detect dragging. These listened areas are drag sensors, or Sensor. There can be multiple sensors. By default, setters and the settings panel have no Sensor, but they can register one to expand the sensing area—for example, the outline tree registers its own Sensor.
Sensor has two key responsibilities:
- Event object transformation, such as coordinate conversion.
- During dragging, use position information together with each layer's
Nodeand component description constraints (such as whether it can act as a container) for further positioning and precise view rendering.
Drag flow
- Initialize multiple
Sensors during engine initialization. - When dragging starts, listen to
mousemove,mouseleave,mouseover, etc. - During dragging, wrap the
MouseEventfrommousemoveinto aLocateEventand pass it to the correspondingsensorfor further positioning. - When dragging ends, update schema and re-render based on the result.
- Remove listeners added when dragging started.
Drag modes
Depending on what is dragged, we classify drag into several modes:
- In-canvas drag: sensor is simulatorHost; after drag completes, nodes are inserted precisely by drop position.
- From component panel to canvas: sensor is still simulatorHost because the drop target is the canvas.
- From outline panel to canvas: two sensors—the outline tree; when dragging into the canvas area, simulatorHost inside the canvas takes over.
- From canvas to outline tree: when dragging starts from the canvas, simulatorHost is active first; when leaving the canvas for the outline tree, the outline sensor takes over. When dropping under a node in the outline tree, the outline converts outline information to schema and renders it on the canvas.
Other
Editor orchestration capabilities go far beyond what is described here. Many details were added during engine iteration and design to make the engine easier to use and extend.
Schema processing pipeline
Through the PropsReducer pipeline mechanism, users can customize logic to modify Schema.
Component metadata processing pipeline
Component description information is collected in each ComponentMeta instance. Consumers span the orchestration process, including but not limited to component drag, drag auxiliary UI, settings area, in-place editing, outline tree, etc.
Opening ComponentMeta customization is critical for user customization, so we designed a pipeline mechanism for metadata initialization and modification.
hotkey and builtin-hotkey
Hotkey implementation and default hotkey behavior bound by the engine kernel.
drag resize engine
For layout-type components, support drag to resize. The resize drag engine is enabled based on ComponentMeta declarations. After dragging, component hook functions (onResizeStart / onResize / onResizeEnd) run to complete resize.
OffsetObserver
Design-mode auxiliary UI must change with render-mode view changes—for example, when the render container scrolls. OffsetObserver provides dynamic listening.
Plugin mechanism
We keep the engine kernel small but highly extensible. All extension features are carried by the plugin mechanism.